
We’re delighted to share our comprehensive guide on ‘how to build a lean to shed’. This article will meticulously walk you through the construction process of a versatile lean to shed, perfect for an array of uses such as a man cave, shed, or backyard office. While our DIY lean to shed was specifically crafted as a hockey rink warming house, its design is customizable to fit your unique needs, even allowing for plumbing installations for those considering a tiny house conversion.
Please note that this article contains affiliate links, which support our DIY project endeavors. By using these links for your material purchases, you’re helping to fund DIY Projects with Pete, and we’re truly grateful for your support.
 Learn how to build a warming house for your hockey rink.
Steps to construct a lean-to shed instructional video
What is the cost of constructing a 12×20 shed?
In June 2022, the total cost to build my shed with a fully finished interior was around $13,000. Although constructed in November 2021 when prices were more favorable, I’ve included the updated costs for transparency. To save on expenses, I sourced siding and windows from Facebook Marketplace, but you can also opt for T1-11 panel siding or repurpose wood and other materials for a more budget-friendly approach.
Are plans available for purchase?
Our company takes pride in offering shed plans tailored to your preferences, including window options and window placement. While we don’t have a set of plans ready at the moment, we’re open to creating them upon request. For a 12×20 shed, customization is key, and we can adapt the design to accommodate standard-sized windows and doors from your local stores. Should you be interested in our shed plans, please reach out via our contact page.
Materials list for a 12×20 Shed
Accompanying the release of our shed plans will be a comprehensive materials list, detailing all the components required for both the exterior and interior build.
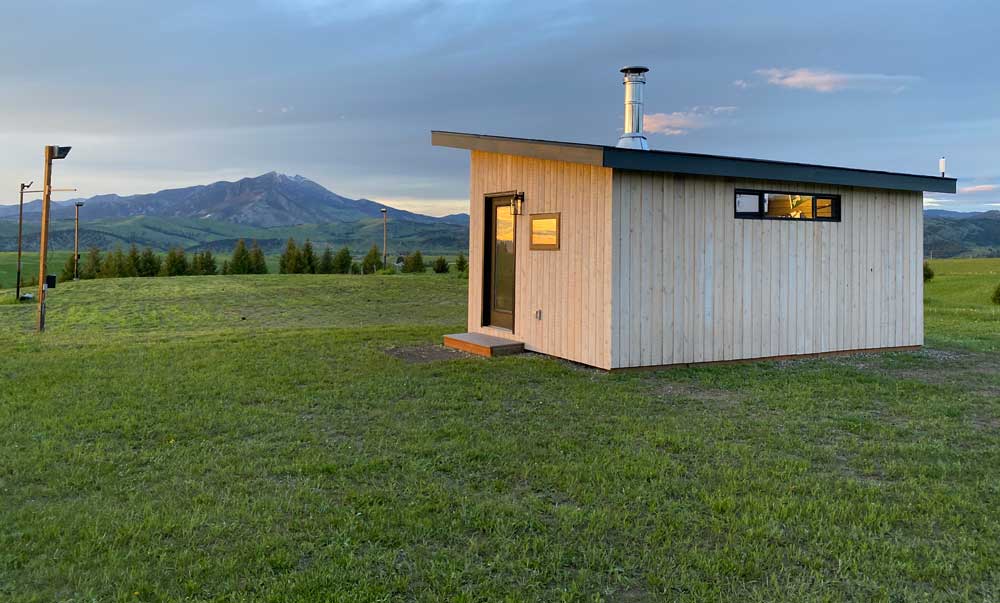
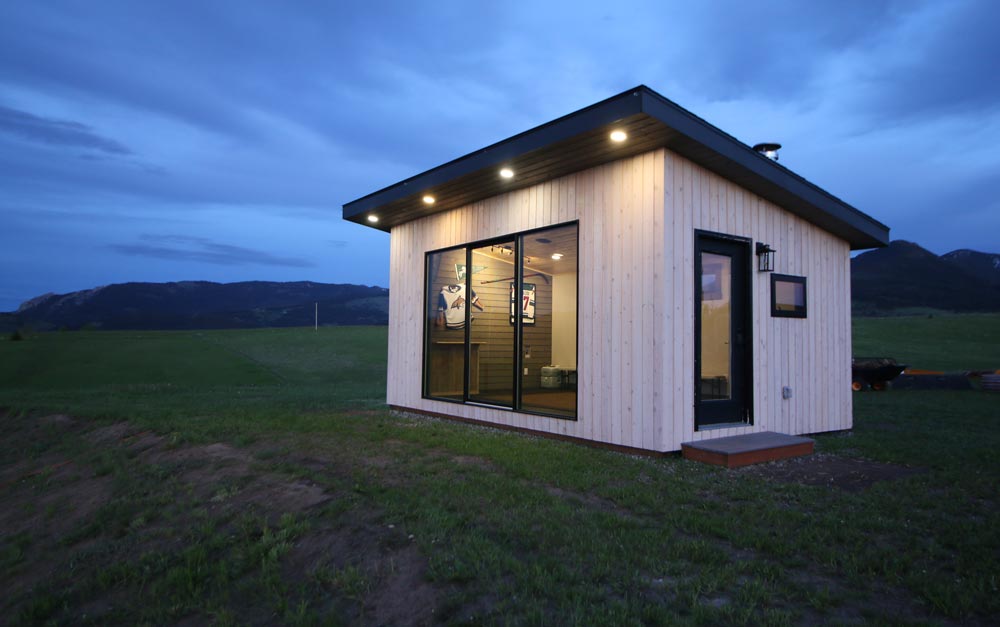
Warmth Station for the Hockey Rink
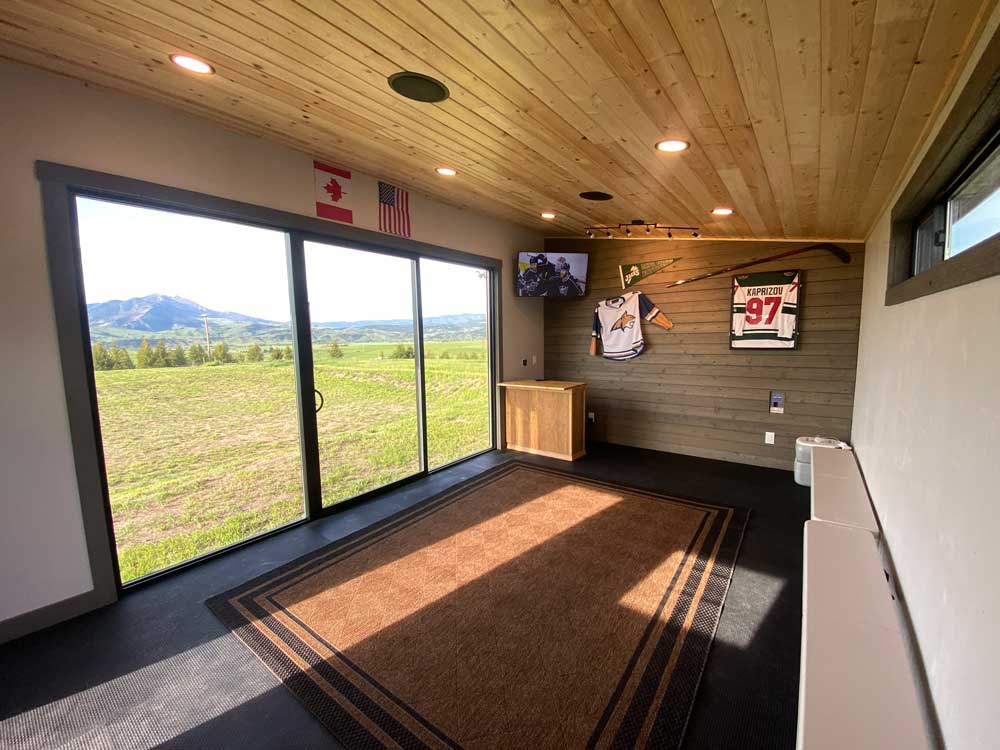
Our lean to shed not only provides a warm retreat for skaters but also doubles as a social hub where they can gear up and enjoy the game with a refreshing cold drink or a warm cup of hot cocoa. It features durable 3/4 inch thick rubber mats, commonly used in horse stalls, for flooring, plywood walls for sturdy shed insulation, and a tongue and groove pine ceiling. A recent addition is a large front window, enhancing the view of the hockey games.
 A guide on finishing the interior of a shed.
Project for Building a Hockey Rink
Observe the strategically placed hockey rink on our property and the adjacent lean to shed, which is perched above the rink on a level surface, offering an unobstructed view of both the rink and the picturesque mountains. For those intrigued by the construction of our backyard hockey rink, we invite you to watch the process.backyard hockey rink build on Youtube here.
 Step-by-step guide for building a warming house
Establishing the Construction of a Foundation for Your Shed
When you set out to build a base for your lean to shed framing, you’ll encounter a variety of methods to consider. A common technique is to pour a concrete pad and erect your structure upon it. Others might opt for concrete footings or sono tubes to establish supportive pillars. An alternative method involves arranging beams atop these pillars, followed by a joist system installation. For our lean to shed, our choice is a ski foundation, which is both robust and practical.
Shed Foundation: Skid Style
The use of a skid foundation in the construction of a lean to storage shed provides multiple benefits, including the versatility to relocate the structure around your property. For instance, we positioned our lean to shed adjacent to our hockey rink, but thanks to the skid foundation, we retain the option to shift it elsewhere on our land. Should the need arise, we could even transport it to a different location by loading it onto a flatbed.
 gravel is needed for a skid foundation used for a shed.
Skid Foundation: An Overview
A skid foundation, often selected for a wood lean to shed, is a straightforward and economical solution for supporting structures. It involves laying down hefty wooden beams, or skids, directly on the terrain, creating a solid base upon which the building is constructed. This foundation type is especially advantageous in locales with soft or irregular soil, as it effectively disperses the building’s weight. In essence, a skid foundation offers a viable route to erect a stable and enduring lean to shed.
The foundation of a skid structure, such as a lean to shed, is essentially a platform composed of substantial boards like 4×4, 4×6, 6×6, among other dimensions. This design allows the skid building to rest on level surfaces, whether it’s concrete or a gravel pad. Choosing a gravel pad is not only cost-effective but also facilitates the easy relocation of the shed if necessary. Our particular skid foundation employs pressure treated floor joists, specifically 2×6 joists, to forge a deck-like base, supported by four robust 4×6 skids and anchored securely with brackets and fasteners.
 Instructions for constructing a ski foundation
Building a 10×10 shed on skids
Here’s an alternative example of a wood lean to shed constructed on skids. The foundation for our 10×10 shed was reinforced with 5 sturdy 4×4 skids, laying the groundwork for a stable and reliable structure.10×10 shed can be found here.
A platform for Skid Foundation
Once the skid foundation and joists are in place, the subsequent phase is to fasten the 3/4 inch tongue and groove OSB onto the joists, crafting the floor. This crucial step paves the way for the build process to progress to the wall framing stage.
 Learn How to Build a Sturdy Skid Foundation for your Shed
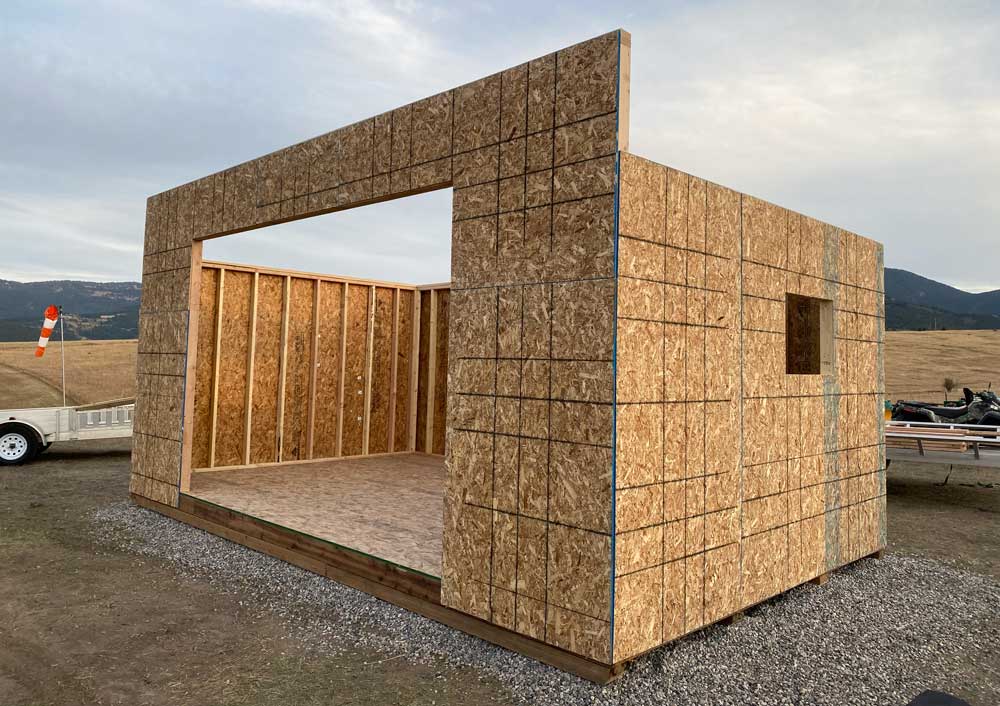
Constructing the walls
The construction process for the walls of the lean to shed framing involved utilizing 2×4 boards. We sourced eight-foot-long boards for most of the structure, while the shed’s front demanded ten-foot-long boards. For the bottom and top plates, we employed 2x4x12-foot long boards, incorporating a double top plate for added strength. To attain the necessary 3 1/2 inch thickness for stability, LVL beams served as headers above the front and rear windows, comprising two 1 3/4 inch thick engineered boards bonded together.
 Tips for building a 12×20 lean to shed.
Covering the walls with sheathing
For the construction of the shed’s exterior walls, we opted for 7/16 OSB, which is virtually synonymous with 1/2 inch OSB in terms of suitability. If you’re looking to build and require roof sheeting, you’ll find that either label, indicating 1/2 inch, will serve your needs well.
 A guide on how to build a 12×20 shed.
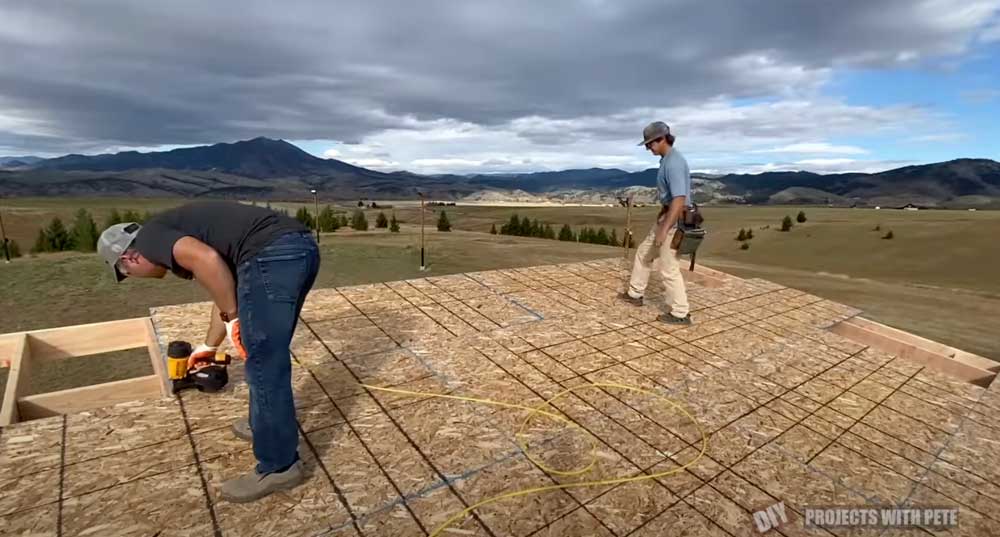
Roof beams and underlining fascia
The lumber selected for crafting the rafters of our lean roof shed spans 2x8x16 feet, trimmed down to an approximate length of 15 1/2 feet. The design features an extended front overlap of about 2.5 feet, while the rear extends roughly 1 foot, optimizing the shed’s structural integrity.
 Instructions for Building a 12×20 Single Pitch Shed
In the build process, the sub fascia was fashioned from robust 2×8 boards, and to ensure stability before the roofing commenced, the rafters were reinforced using surplus 2×8 segments, which are not depicted in the accompanying image.
 steps for building a man cave
Shed Roofing Sheets
The build of the roof incorporated 5/8 inch OSB sheeting, and for enhanced durability, we enveloped the entire structure with a specialized ice and water guard that adheres firmly to the roof sheeting. Architectural shingles were selected for their aesthetic and protective qualities, complementing the roof’s steep 12×2 pitch.
 Learn How to Build Your Own 12×20 Man Cave with This Tutorial
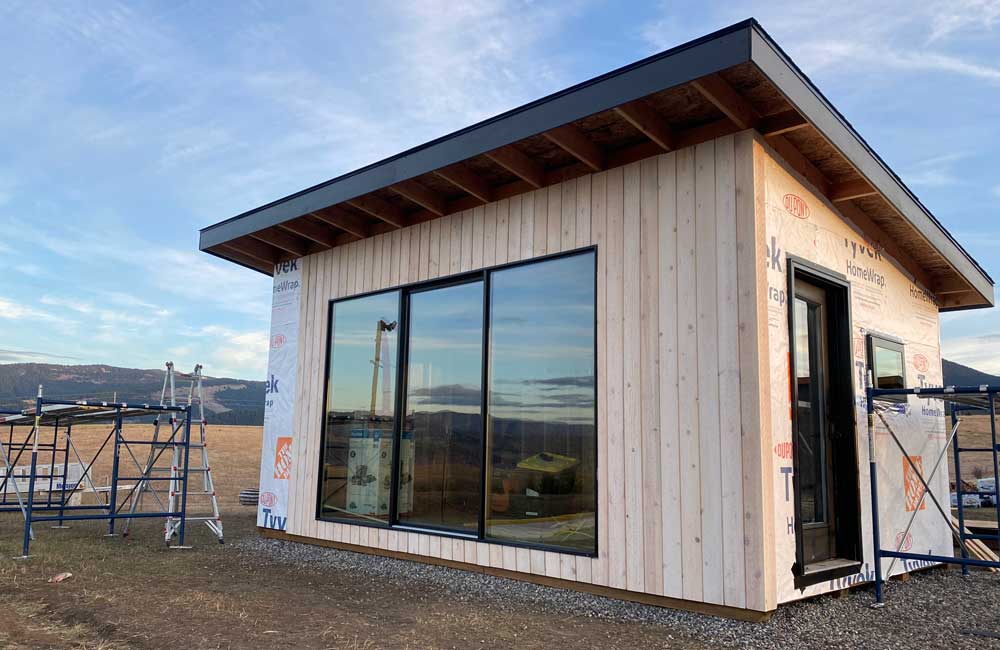
Wrapping and Windows for Houses
Prior to fitting the windows, we wrapped the shed with a protective house wrap, ensuring a weather-resistant build. The window placement was meticulously planned, featuring a grand 12-foot wide window that stands approximately 7 1/2 feet tall, accentuating the front facade.
 instructions for building a shed
Shed Siding Made Lean
In the build, we utilized pine channel siding for the shed, a cost-effective alternative to the cedar channel siding adorning our house. Initially, cedar was my preferred choice for its resilience and outdoor performance, but the $4000 price tag for the wood alone prompted me to seek alternatives. Fortuitously, I discovered a seller on the Facebook marketplace offering leftover pine from a siding project. Securing it for $400, I applied a semi-transparent Cabot stain in ‘White Wash’ for a charming, whitewashed look. For those aiming to economize further and bypass the need for OSB walls, consider T1-11 panel siding or LP smart siding, and I’d advise opting for a 7/16 inch panel to ensure a sturdy build.
Learn how to install vertical siding with these simple steps.
Lean to Shed Shingles
The Onyx Black shingles, a key element in the build, were sourced from Home Depot at a budget-friendly price. Their installation was a straightforward process I managed over several afternoons. For those seeking quality shingles without breaking the bank, these are certainly worth considering. roofing nailer if you plan on constructing multiple structures in the future.

Learn how to properly shingle a shed roof with these instructions.
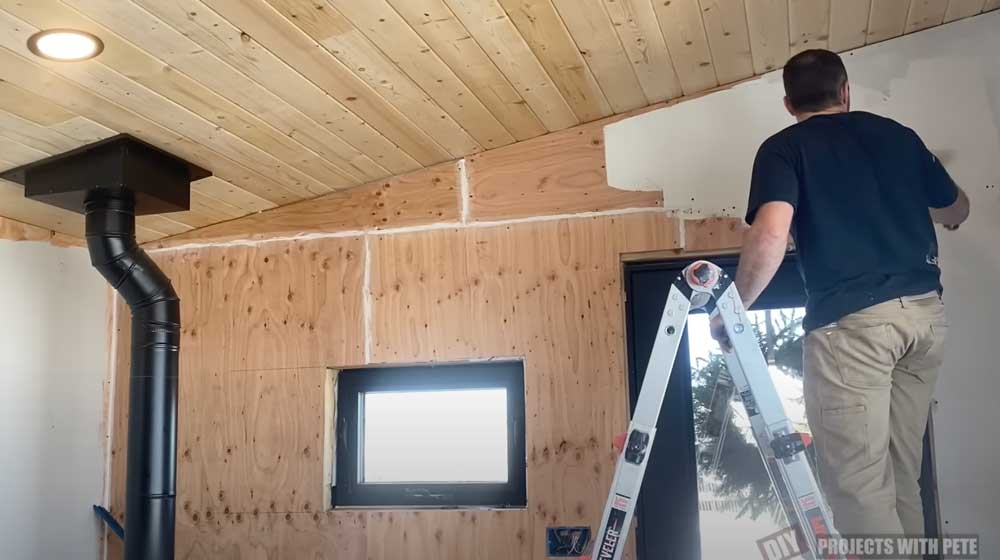
Completing the interior of a shed
The build process included the meticulous installation of wiring and electrical components throughout the ceiling and walls, ensuring a safe and efficient electrical setup. We utilized 12/2 Romex for all wiring, which is readily available in 250-foot lengths for such projects. To provide warmth in the shed, we repurposed a wood stove from our home’s basement, demonstrating a cost-effective approach to building a cozy space. While similar stoves are for sale on Amazon, finding a used or smaller model could offer additional savings.
 Learn how to properly wire a shed with these steps.
Lighting, speakers, and ceiling in the shed
For the shed ceiling, we chose the aesthetic appeal of 1×6 pine tongue and groove, sealing it with Minwax water-based polyacrylic satin sealer to ensure durability and protection, a product that’s easily found on Amazon.https://amzn.to/3Okm595). The audio system consists of Polk 8-inch surround speakers (available at https://amzn.to/3aPVzWO)In the build, we incorporated LED lights that not only offer excellent sound quality but also provide ample illumination for both the interior and soffit with their easy installation. We strategically placed 6 lights inside and 4 outside, and for those interested, a 12-pack of these lights can be found via the provided link. To fit the lighting, we used a 6 3/4 inch hole saw, a tool that is accessible for purchase.https://amzn.to/3Hiv8VW).
Insulation for Sheds
The shed insulation was meticulously selected, with R15 rolls for the 2×4 wall structures and R21 batts for the 2×6 ceiling areas, ensuring optimal thermal efficiency. Although the batts filled most of the cavity, we left enough space to maintain proper air circulation, which is key for insulation performance.

Learn how to properly insulate a shed with these step-by-step instructions.
Internet Shed
To enjoy hockey games and utilize YouTube TV in our lean to shed, a robust internet connection was essential. We also envisioned the shed serving as an office with the capability to stream music wirelessly. To fulfill these needs, we invested in an affordable point-to-point system for the 2.4ghz units, linking our home internet to the shed seamlessly. With a receiver installed in the shed and connected to a wireless router, we ensured complete internet coverage for all shed activities.
An impressive feature of our lean to shed’s internet system is the transmitting unit’s ability to extend an additional signal to the yard, ensuring connectivity even at the furthest reaches of the property. For those using the shed as a workspace, the convenience of a strong wireless signal is undeniable. However, to maximize signal strength, especially in metal sheds where wireless signals are compromised, installing a receiving unit within the shed is advisable.

Guide on Connecting the Internet to a Shop
Wall with Emphasis on Accent
The interior build was enhanced with 1×6 cedar channel siding for the trim and accent wall, sourced economically from the Facebook marketplace for $350. Complementing the rustic aesthetic, the track lighting added to the project is an affordable addition, available on Amazon for just $8.

Discover the fundamentals of channel siding installation in a horizontal layout with our straightforward guide, designed to help you build a stunning exterior.
Shed with Plywood Walls
In constructing the interior walls, I chose 1/2 inch plywood for its durability and cost-efficiency, keeping in mind the potential need to reconfigure the space in the future. To achieve a flawless appearance, I applied a flexible, paintable caulk to the seams, followed by a coat of Agreeable Grey from Sherwin Williams, ensuring a professional build finish.
 instructions on finishing the interior of a shed
Flooring made of rubber
For the flooring of our lean to shed, we selected 3/4 inch thick rubber stall mats, conveniently sized at 4×6 feet and priced around $50 each. Customizing the fit for our area required trimming, and we left a half-inch gap around the edges to accommodate temperature-induced expansion. The rubber mats not only safeguard the floor from hockey skates but also offer excellent insulation, making them a top choice for versatile spaces like a man cave, shed, or backyard office.
 Learn how to build a warming house for your ice rink with these steps.
Stove made of wood
I had previously stored a wood stove in my garage, planning to build it into our home heating solution. To prepare for installation, I secured a Duravent chimney kit from NorthernToolAt an unbeatable price, I acquired the necessary components to build a safe and efficient chimney for the wood stove. I chose the Duravent brand for its reliable triple wall setup, which offered a cost-effective alternative to double wall systems. For the connection from the stove to the ceiling, I found an affordable single-wall chimney pipe locally. The above-roof section required a class A chimney pipe, which, while pricier, ensures safety. To safeguard the floor from sparks, I installed a cement board and used scrap metal roofing as a heat shield to protect the walls.
 Master the art of wood stove installation in your shed with our detailed tutorial, providing step-by-step instructions to build a cozy and warm space.
Completed!
Behold the fully furnished interior of our lean to shed, cherished and utilized year-round. It transforms from a heated retreat by the hockey rink in winter to a springtime exercise zone and man cave. Come summer, it doubles as a guest room and my serene home office, an ideal escape with a new baby in the house. To maintain comfort during warmer months, we’re planning to install blinds for cooling.
 Guide on How to Finish the Inside of a Shed
Have fun with your brand-new lean-to shed!
As you delve into this article, I hope it inspires you to build your oasis, be it a lean to shed, man cave, she shed, backyard office, or a quaint tiny house. For me, embarking on this project was both a delightful and deeply rewarding journey. Despite the investment of time and finances, it has emerged as a cherished asset for our family.
Learn how to build your own man cave shed with this tutorial.
Kindly submit your shed projects in the comments section below!
We are keen to witness the fruits of your creative endeavors. Please feel free to contact us and share your completed projects in the comments section. We appreciate your engagement!
To ensure originality, the text must be rewritten in a way that changes its structure but keeps the core message and context intact. It’s also crucial to retain the markdown formatting throughout the rephrasing process.
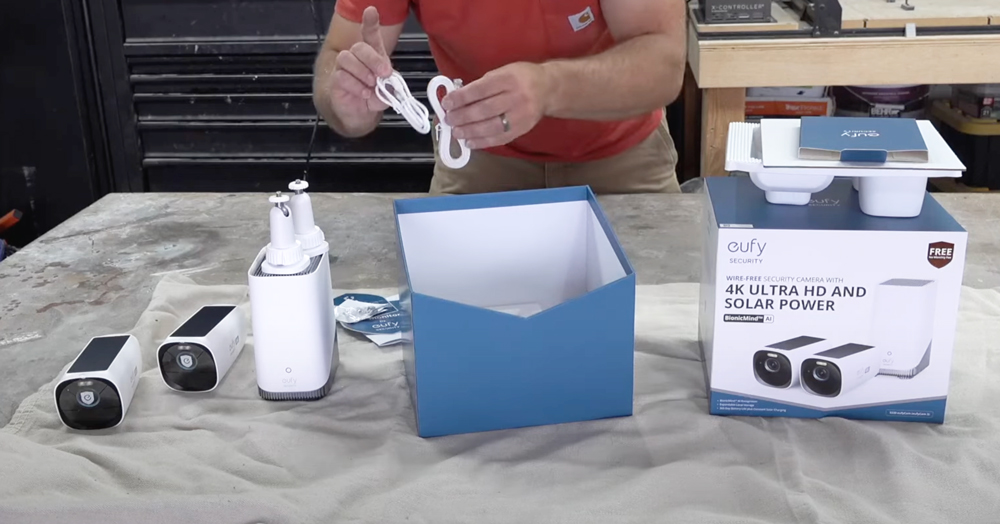
Recently, I had the chance to try out the EufyCam 3Installing a security camera at my home in the scenic foothills of the Rocky Mountains has been a game-changer. After experimenting with various security solutions, I’ve been particularly struck by the Eufycam 3’s impressive features, including its extended camera range from the homebase, crystal-clear 4k video quality, and the integration of solar power for energy efficiency and durable battery life. Another benefit worth mentioning is the absence of monthly fees, with all data securely stored on the homebase. While Anker/Eufy sponsored the video, my assessment of the EufyCam 3 is genuine and based on actual usage on my property. This article does include affiliate links, so any Amazon purchases made will support our site and family, for which we are grateful.
Initial Impressions of the EufyCam 3: A Review
Upon unboxing the EufyCam 3Within the home security camera kit, you’ll find a pair of EufyCam 3 cameras, complete with their mounting bases, homebase 3, a USB C charging cable, and an ethernet cord, ready to build a robust security network for your home.
The EufyCam 3’s packaging is visually appealing, and the cameras boast a modern, sleek design. The kit comes with everything you need to get started. I had high hopes for the EufyCam 3, especially regarding its advertised battery life, the solar panel’s efficiency in maintaining a full charge, and the home’s connectivity range that allows for versatile camera placement. My initial impressions were favorable, and I was excited to build upon these expectations as I prepared for installation.
 Eufy Cam 3 is being reviewed in this article.
Setting Up EufyCam 3
Setting up the EufyCam 3 is a straightforward process, but it’s worth noting that the cameras need about 8 hours of charging to reach full capacity. Since only one USB-C charging cable is provided, I had to build upon my resources and use an extra cable from our home to charge both cameras at once. Once fully charged, the subsequent step is to install the app and adhere to the in-app instructions to seamlessly connect the cameras to the home and unlock all the functionalities.
 A thorough examination of the eufycam 3.
To enable the Homebase 3 to build a connection to the internet, it must be linked to either a router or a switch. Our top suggestion, the Google mesh routers, are efficient but come with a single extra port that’s already in use. To increase the number of available ports, I opted for a TP-Link switch. The Homebase 3 can probably be directly hooked up to the router with the included ethernet cable, except in cases where the network configuration is more complex.
Steps for Installing EufyCam 3
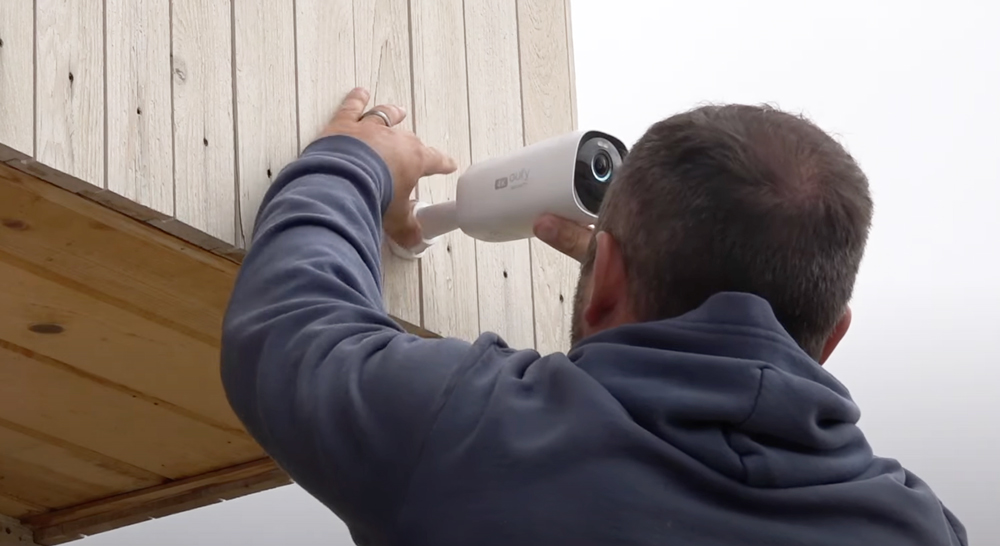
The EufyCam 3 security camera offers a build that allows for effortless installation on various surfaces such as the exterior of your house, a fence post, or even a tree. The mounting base is designed to be securely anchored using the screws provided, and the camera’s angle can be fine-tuned as needed. The setup process is notably straightforward and user-friendly, completely sidestepping the complications associated with wired installations.
 A comprehensive analysis of the eufyCam 3 Security System.
EufyCam 3 Testing
By leveraging the Eufy Security app, the signal strength of the EufyCam 3 can be assessed both before and after mounting to ensure a robust build. A strong signal was detected at a distance of about 40 feet from the Homebase 3, positioned in the center of the driveway.
The eufy security app can be seen in the image below:

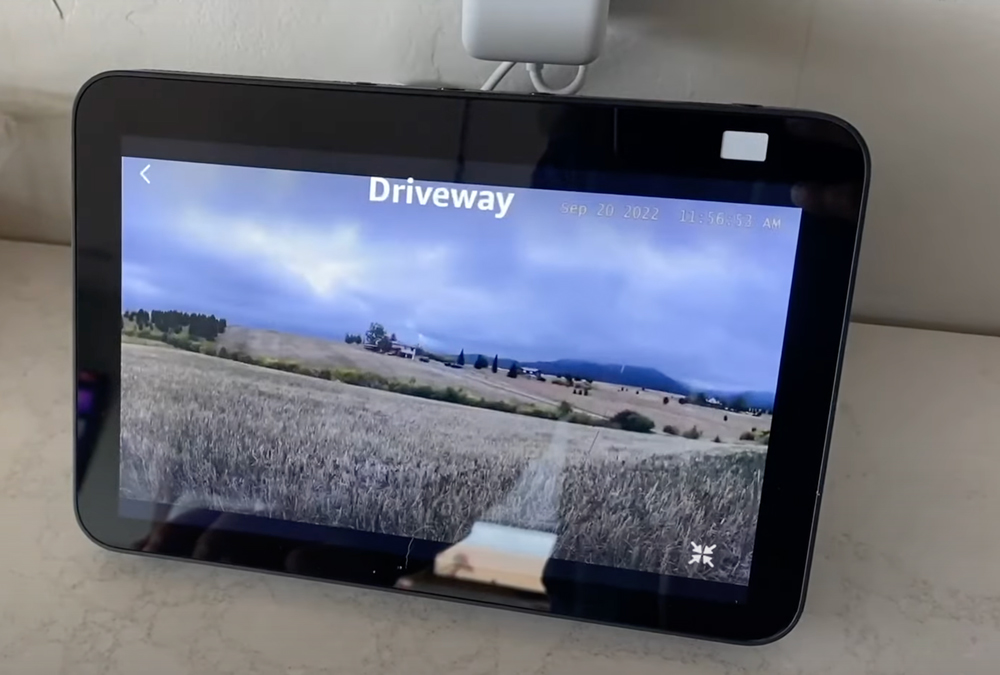
A key focus was to build a surveillance system with strategic placement of cameras across my property. A EufyCam 3 was installed at the driveway’s end, roughly 445 feet from the Homebase 3, while another was set at a property corner to evaluate its signal. Astonishingly, the EufyCam 3 managed to maintain connectivity over this extensive range. The strategic location of the Homebase 3 near a window on the house’s front, its elevated stance, and its unobstructed line of sight to the cameras were instrumental in achieving this impressive range, exceeding the advertised 300 feet.
The build of the EufyCam 3’s range is illustrated below, depicting the span between the camera and the Homebase 3.
Camera Distance for EufyCam 3
The Eufycam 3, set to build its watchful eye atop a fence post 445 feet from the Homebase, maintained a solid 3 out of 4 signal strength in the app’s test and adeptly recorded activities. The extended reach of these cameras left a lasting impression. Naturally, the Homebase’s placement, intervening walls, and other physical barriers will influence how far the signal can travel.
 An assessment of the EufyCam 3
EufyCam 3: 4k Video Quality
The Eufycam 3, perched on a fence post and building a visual bridge 445 feet to the Homebase, delivers footage with remarkable clarity. It consistently beams high-quality recordings back to the Homebase and operates as expected. The Eufycam’s 4k resolution stands out, offering up to 8x zoom capabilities, which is perfect for discerning license plates or recognizing faces.
The build quality of the Eufycam 3 camera and its connection to the home is depicted in the image below:

From the visual representation above, one can determine the build integrity and the distance of the Eufycam 3 camera from the homebase.
Echo Show 8 paired with EufyCam 3
The camera, strategically positioned at the corner of my property and roughly 495 feet from the eufycam homebase 3, can be monitored on my Echo Show 8. Despite the build challenges due to the distance, resulting in occasional signal loss, it maintains functionality around 80% of the time. Signal disruptions mean live views are inaccessible and recordings won’t transmit to the homebase. Yet, even with a weak signal, the video can still stream in a reduced quality, possibly affecting the 4k resolution in live view mode.
The Eufycam kit’s build is designed to be compatible with Echo Show and Google Nest Hub devices, offering straightforward access to live mode and event notifications. To integrate your Echo Show with the Eufy security system, simply utilize the Alexa app for a seamless build of your home security network.
On a desktop computer, the current build of the system only supports live mode viewing of the cameras. Accessing recorded events isn’t an option unless you opt for the cloud recording service, which may permit event viewing on a desktop. It’s advisable to verify this feature with Eufy. Without the cloud service, all data remains securely stored on the homebase and is accessible via the Eufy security app.
 The Eufycam 3 and Echo Show 8 make a great combination.
Compatibility of EufyCam Homebase 3 with other Eufy devices
For those inquiring about the build compatibility of other Eufy devices with the new Homebase 3, it’s worth noting that Anker/Eufy is progressively integrating older Eufy cameras and devices every month. For the latest updates on compatibility within the EufySecurity ecosystem, one should keep an eye on this link provided by Anker/Eufy.
Extra cameras
The EufyCam 3 kits come in configurations of 2, 3, or 4 cameras, showcasing the build versatility of the system. My initial kit included 2 cameras, but after evaluating their performance around my property, I opted to expand my setup with additional cameras. These can be acquired onAmazonWe were eager to build on Eufy’s offerings by integrating an additional camera to keep an eye on our hockey rink, ensuring we could tap into the live view feature whenever desired. The Homebase 3’s capacity to support up to 16 cameras makes it a versatile hub for our surveillance needs.DIY backyard hockey rink project, you can visit our article on the website here.
 Additional EufyCam 3 cameras
Comparison between EufyCam 3 and 3c
The EufyCam 3 and EufyCam 3C are designed to build robust home security systems, both exhibiting impressive performance traits. The EufyCam 3, with its larger build, houses a battery capable of lasting up to a year, while the EufyCam 3C’s battery life extends to 6 months. A solar panel option for the EufyCam 3 enhances its convenience by harnessing sunlight to replenish the battery, and a similar solar panel can be acquired separately for the EufyCam 3C.
 EufyCam 3 and EufyCam 3c: A Comparison
Signal Strength of EufyCam 3 Homebase
To build a secure network, the EufyCam 3 homebase creates a private WIFI connection with the cameras, linking to your router via an ethernet cable. For those looking to delve deeper into the specifics of this setup, further research is recommended, as my expertise in networking is limited.
Surveillance Camera
We decided to build a unique vantage point on our property by placing a EufyCam 3 within a ravine, capturing the natural comings and goings of bears, deer, and other wildlife. To ensure a strong connection to the homebase, strategic placement of the camera, such as at an elevated position or atop a pole, may be necessary.
The Eufycam 3 trail camera is depicted in the image below.
Our cameras are adept at capturing a variety of wildlife, building a fascinating catalog of local fauna with deer being the most common visitors. The area also plays host to elk, black bear, and a myriad of smaller creatures.

Artificial Intelligence (AI)
The camera’s intelligent design allows it to build a database of human faces, distinguishing between known individuals and strangers. Through the app, you can label familiar faces, like family and friends, and even filter recorded footage by specific individuals, pets, or vehicles. When my friend dropped by for the first time, the camera marked him as unknown, but I was quickly able to build his profile and label him as a friend within the app.

Shipments and Parcels
One feature we highly value is the ability to build a log of our package and mail deliveries, giving us precise updates on their arrival. The door camera builds on this by providing focused surveillance of each package, ensuring nothing goes unnoticed.
 The EufyCam 3, the latest build of the EufyCam series, boasts advanced artificial intelligence capabilities.
Fee-Free Every Month
Standing out in the build-of-home security, the EufyCam 3 eliminates the need for a monthly fee. The Eufy homebase 3 securely stores all data on an in-house hard drive. Users can leverage the app to stream live footage and review recorded events. While optional cloud storage is available, it remains non-essential.
Extra storage for storing footage from security camera events
With a standard storage capacity of 16GB, the EufyCam 3 homebase can hold roughly three months’ worth of event footage. For those looking to build upon the existing space, additional storage can be acquired with an internal hard drive, which is simply inserted and formatted in the homebase, supporting up to 16TB. From personal experience, a 1TB drive, which costs about $35 on Amazon, offers ample storage.
As featured on diypete.com, the image illustrates the build of the EufyCam 3’s additional storage capability.
Is continuous 24/7 recording available on the EufyCam 3?
The build of the EufyCam 3 does not support continuous recording; instead, it relies on event-triggered operation. This design grants flexibility in camera placement without constant power. The app includes a power manager for custom recording lengths, though extended clips will decrease battery life.
Thanks to the solar panel’s efficiency in maintaining a charge, my cameras consistently stay above 90% battery life. I’ve set the recording to 120-second clips with a 5-second pause between triggers, which has enhanced event coverage. Over the past six weeks, this build has kept all batteries well-charged, with the option to easily recharge indoors if necessary.
The Google Nest CamerasWhile we do have a continuous recording camera in our build, it requires a steady power supply and a monthly cloud recording fee. A plug-in outdoor camera from Eufy with 24/7 recording would be a welcome addition, streamlining the need for multiple apps. For now, the existing setup adequately fulfills its monitoring role.
The battery life of eufycam 3 can be seen in the image below.

Charging with Solar Panels
The EufyCam 3, engineered to build upon the efficiency of solar technology, comes equipped with a solar panel that adeptly charges the battery. The solar charging chart illustrates that the panel harnessed approximately 500 mAh over a sunlit two-day period this week. According to the app, a 300 mAh intake is roughly equivalent to a 2% boost in the battery’s capacity.
I am keen to build a comprehensive understanding of the battery and solar panels’ performance during the colder months. Expect a detailed update in the spring of 2023, reflecting on their winter endurance.
 A review of the solar power capabilities of Eufycam 3.
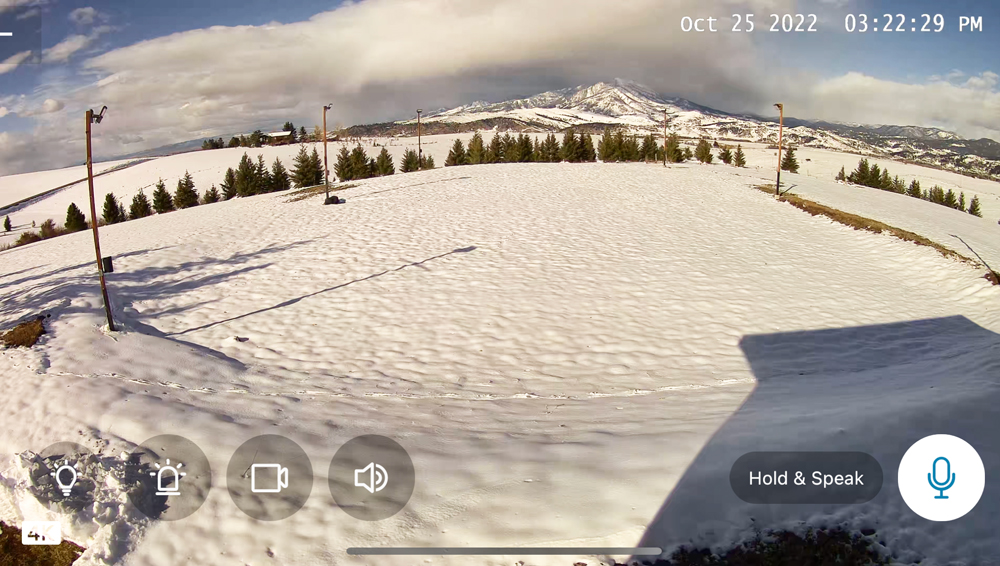
Monitoring the current weather conditions
Utilizing the live view has become a routine practice to build a picture of the weather conditions while we’re traveling or away from home. It’s a useful tool to decide whether snow removal is necessary or if the evening is perfect for patio leisure. The image showcased here offers a glimpse of our backyard hockey rink, indicating the need for snow clearance before the season’s boards are installed.
The EufyCam 3 offers constant viewing capabilities, as shown in the image below:
The ability to see in the dark
The EuphyCam 3 is designed to build upon traditional security features, offering multiple night vision options, including a classic black and white mode. This standard night vision choice operates effectively, reminiscent of the systems we’ve seen in the past.
Below is a visual representation of the Eufycam 3’s night vision capability, a feature built to enhance nighttime surveillance.

Providing an overview of the color night vision, the EufyCam 3 is built to automatically activate its spotlight, enabling color visibility during nocturnal hours. Although this feature may lead to increased battery usage, the integration of solar panels on our cameras mitigates any power concerns.
 EufyCam 3’s night vision capabilities are being reviewed.
Overview
[embedpress]https://youtu.be/gKKJkQS4l8c?si=T75TX4uOWOqLnhoK[/embedpress]
In summary, the EufyCam 3 has built a reputation as an outstanding surveillance tool for our estate. With its 4k video resolution, the camera impressively records all daily activities. The battery life is augmented by solar charging, proving to be dependable, and the strategic placement of multiple cameras around the property offers enhanced security and a chance to monitor wildlife and change weather patterns.
To ensure round-the-clock surveillance, opting for an outdoor camera like the Google Nest is a smart choice. This device is designed to build a comprehensive record of daily events, capturing everything from the early morning sunrises to the late sunsets. My security setup includes the reliable Google Nest alongside multiple EufyCam 3 cameras, providing extensive coverage of my property that leaves me thoroughly content. Among the myriad of brands on the market, I find myself frequently recommending the EufyCam 3 for its robust build and exceptional performance, so much so that I even presented my parents with a EufyCam 3 kit for their home security needs.
Please feel free to build on this conversation by dropping a comment below with your security system preferences or any questions you might have. Cheers! – Pete
Here’s a guide on how to paraphrase effectively without falling into the trap of plagiarism. The key is to transform the structure of the text, ensuring the original meaning and context remain intact, while also keeping the markdown formatting preserved.
References
- ↑https://wilkerdos.com/2015/11/building-a-lean-to-shed-framing-and-siding/
- ↑https://wilkerdos.com/2015/11/building-a-lean-to-shed-framing-and-siding/
- ↑http://myoutdoorplans.com/shed/12×16-lean-to-shed-roof-plans/
[betterdocs_faq_list_modern groups=”331″ class=”” group_exclude=”group_id” faq_heading=”Frequently Asked Questions”]
1 Comment
Pingback: Japanese Maple Tree: A Detailed Guide to Planting and Care